Lemon Bars
This post may contain affiliate links. Please read my disclosure policy.
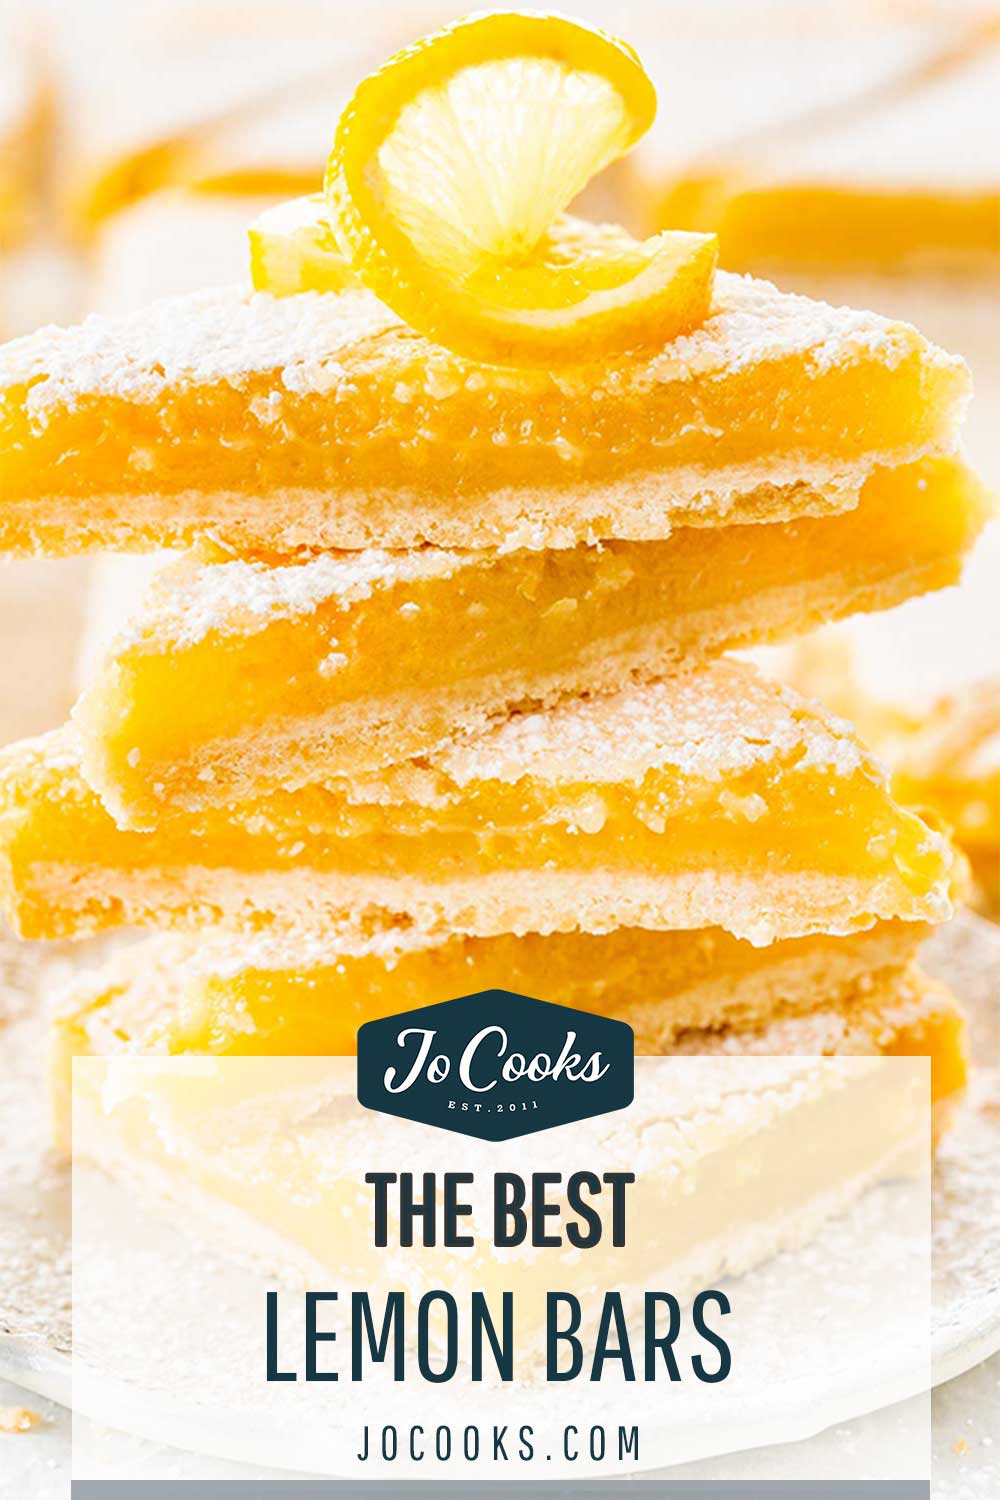
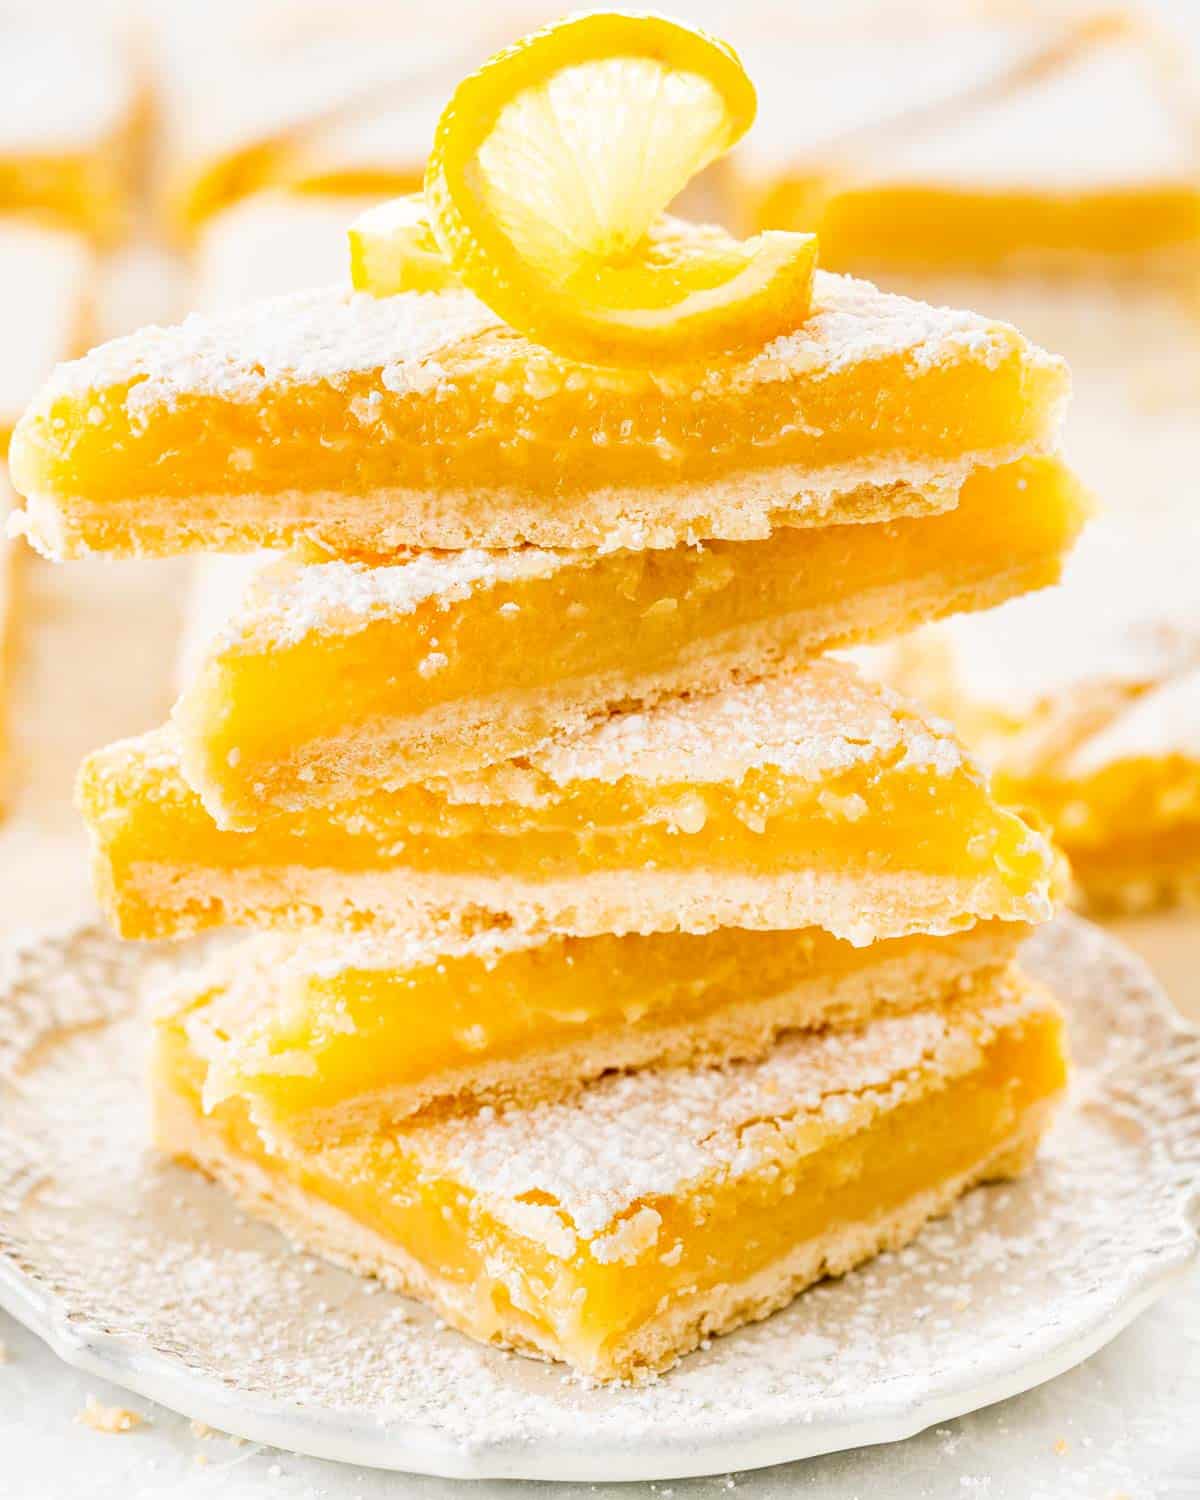
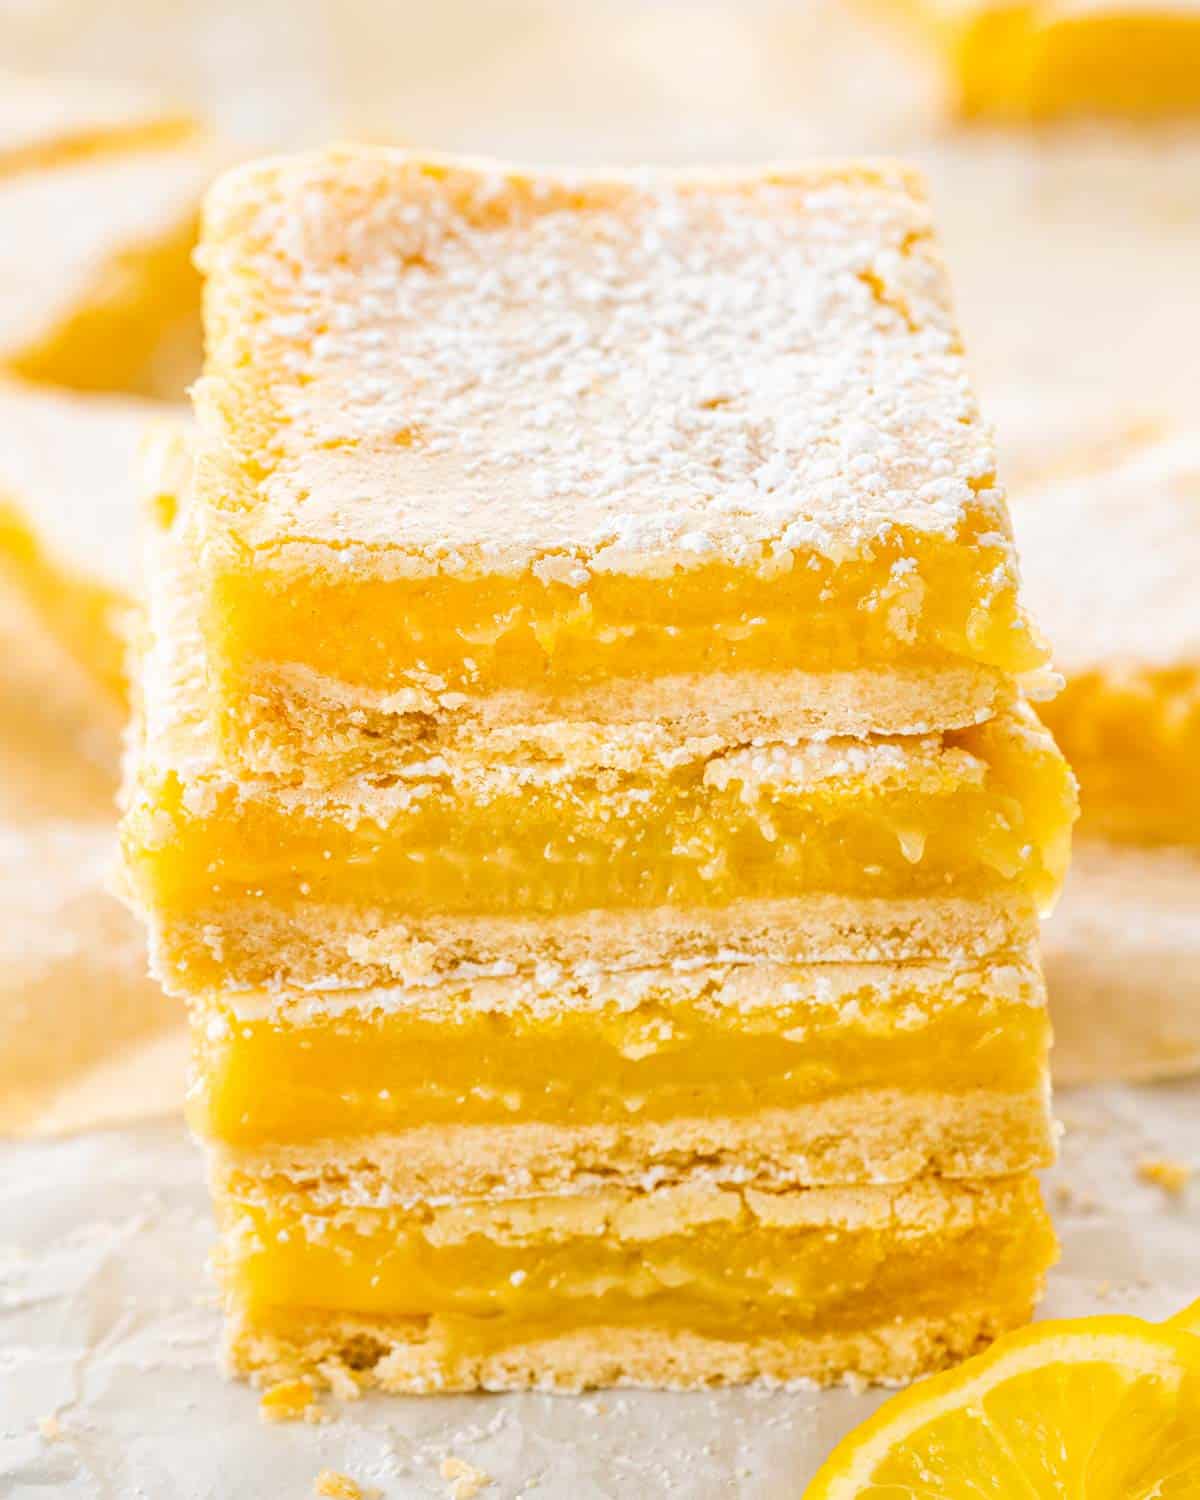
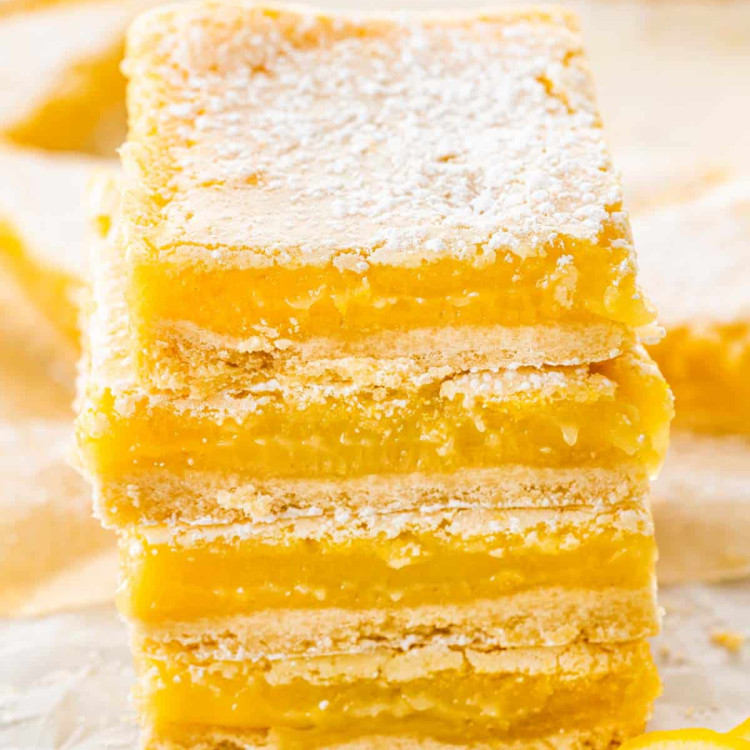
A classic recipe for Lemon Bars with a shortbread crust and a sweet, yet tart, lemon curd filling. You only need 6 ingredients to make these lemon bars. These Lemon Bars are a zesty, sweet sensation, promising each bite to be a little ray of sunshine, perfect to light up any day!
Lemon Bliss: Unwrapping Sunshine and Sweetness!
These Lemon Bars bring a ray of sunshine straight to your taste buds, unlocking a vibrant symphony of sweet, tangy goodness with each bite! The buttery, crumbly shortbread crust forms a divine base, eagerly waiting to complement the lively, zesty lemon filling. Trust me, each bite is a cheerful dance of flavors, perfectly balancing the sweet with the sour, leaving you reaching for more.
The easy-to-follow steps make whipping up this citrusy delight a breeze! Whether you’re a baking newbie or a seasoned pro, you’ll find the joy in crafting these lemony treats. Plus, their eye-catching appearance and refreshing taste make them a hit at any gathering!
Why Make These Lemon Bars
These bars are so good and such a great use of those excess lemons you might have in your fridge! If you love citrus, baked goods, or anything lemony, you absolutely must try these lemon bars!
- Only 6 Simple Ingredients that you likely already have in your pantry.
- Easy Straightforward Recipe that’s incredibly easy to follow, literally fool proof.
- The Best Lemon Bars You’ll Ever Try!
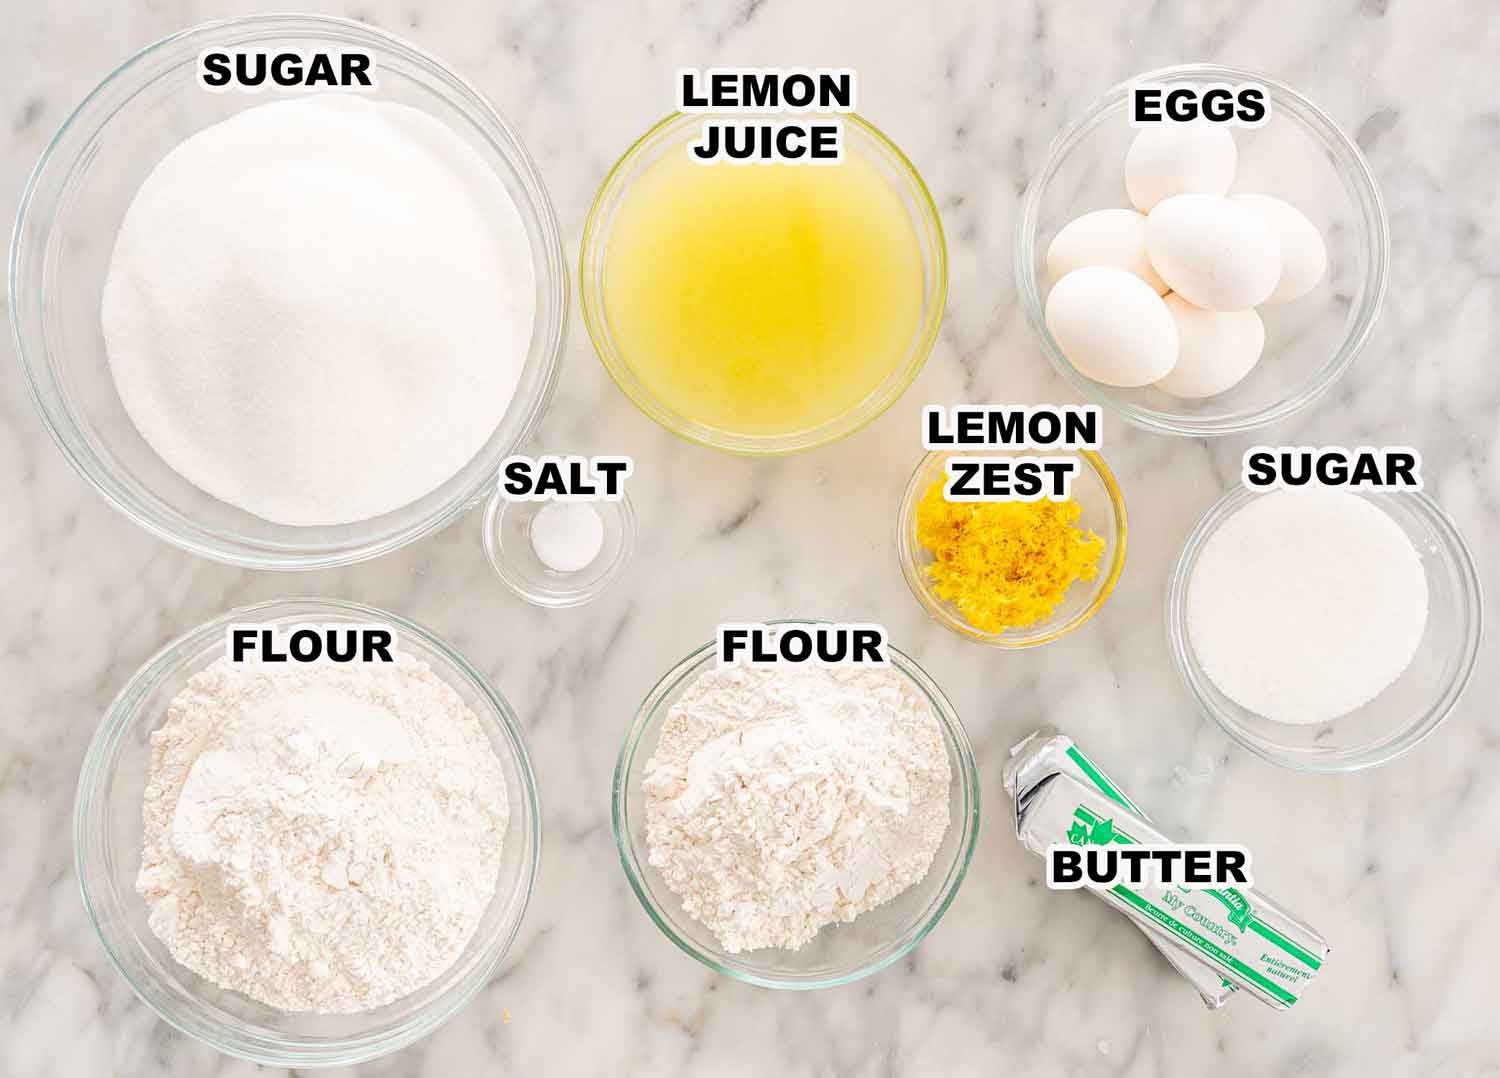
- Granulated Sugar: Sweetens both the crust and the filling; you could swap it with coconut sugar if you fancy.
- Unsalted Butter: Gives the crust its richness and flaky texture; if needed, margarine is a solid alternative.
- All-Purpose Flour: Forms the structure of the crust and thickens the filling; gluten-free flour works too!
- Salt: Enhances the overall flavor; any type of edible salt does the job.
- Large Eggs: They set the filling and make it rich; sadly, there’s no ideal substitute for this one.
- Lemon Zest & Juice: They’re the star of the show, providing that tangy kick and fresh, zesty flavor; in a pinch, use bottled lemon juice and maybe a bit of orange zest for a twist!
- Powdered Sugar: For dusting over the bars adding an extra layer of sweetness; if you don’t have it, a light sprinkle of granulated sugar can add a sweet crunch.
Get ready to whip up some seriously zesty and oh-so-refreshing Lemon Bars! These babies are super simple to make, and the payoff is huge—think sweet, tangy goodness in every bite!
Alrighty! First thing’s first, let’s get that oven all warmed up to 350°F. Yep, just hit the preheat and let it do its thing! Next, grab a 9×13-inch baking pan and line it with parchment paper. Make sure the paper hangs over the sides a bit; it’s gonna help us lift out those bars easily later on!
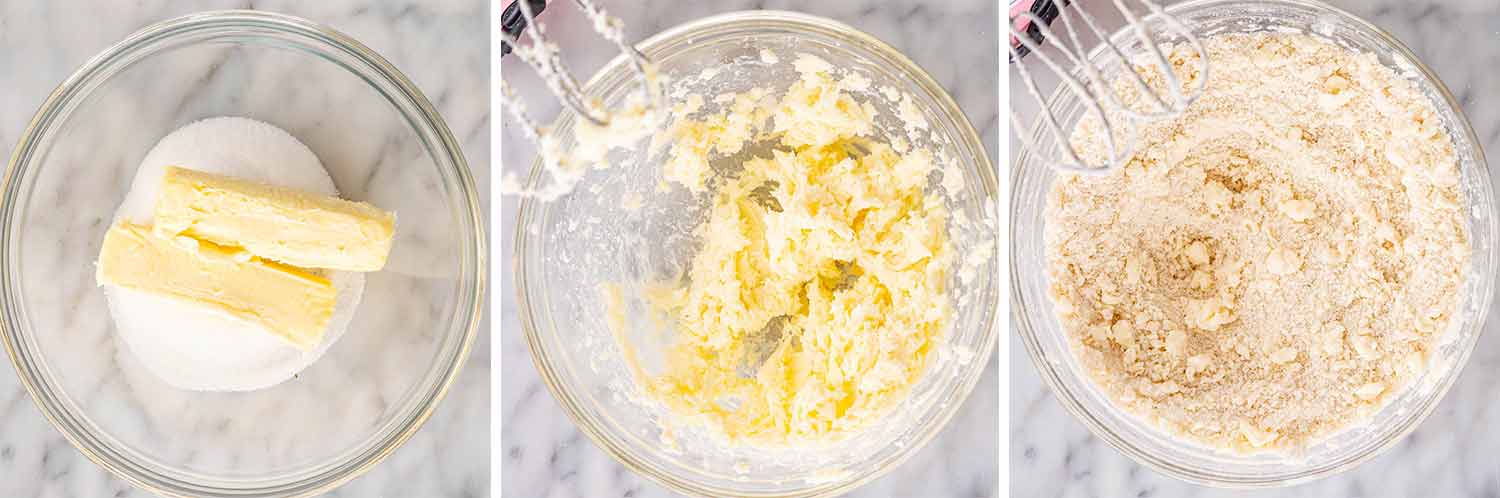
Now, for the crust! In your mixing bowl, blend together the sugar and butter until it’s nice and fluffy. Then, toss in the flour and salt, and mix until it all comes together—think crumbly but cool!
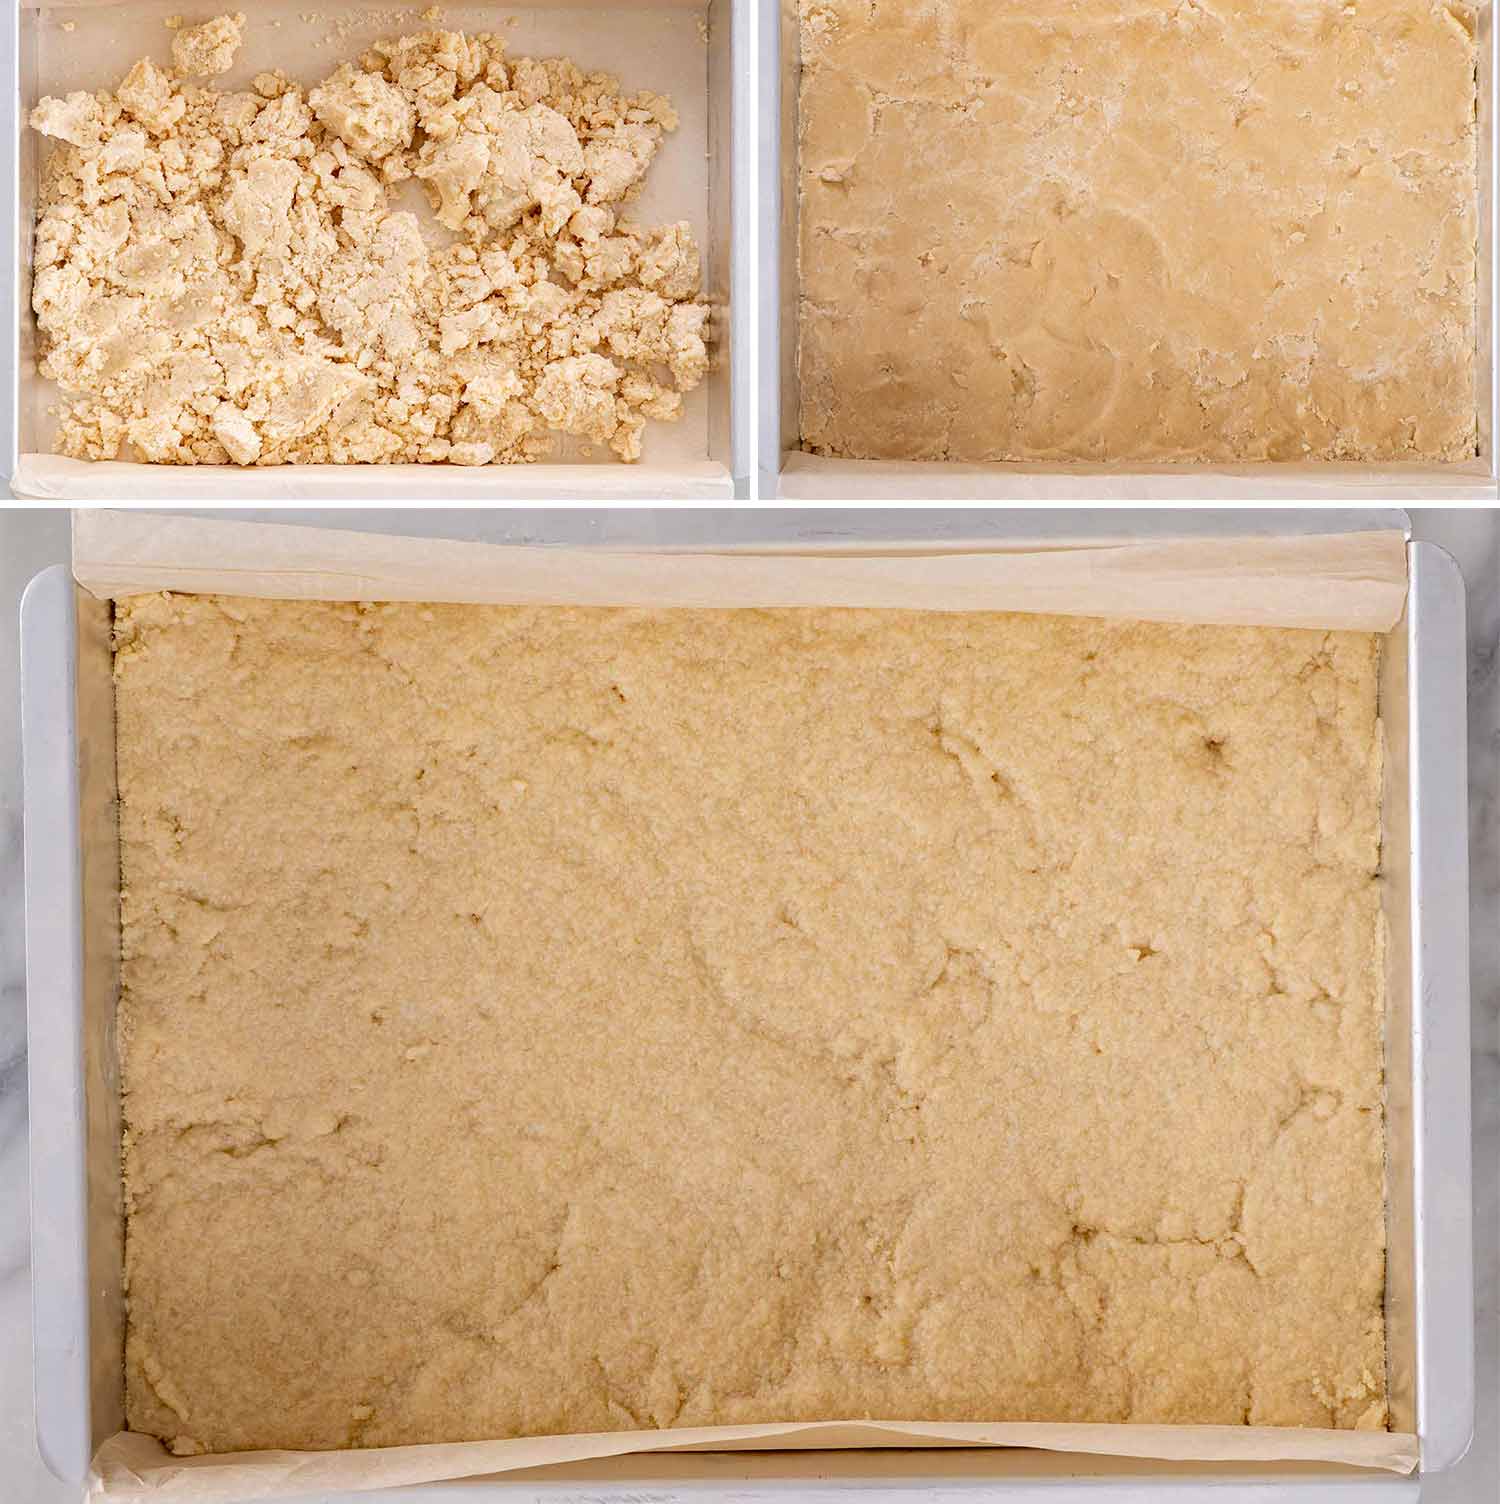
Dump that crust mix into the pan and press it down flat—you can use your hands or the bottom of a glass. Slide it into the oven for about 20 minutes. You’re looking for a light brown color around the edges. Then, let it chill and cool down a bit.

While the crust is getting its cool on, let’s whip up the filling! Mix together the eggs, sugar, lemon zest, lemon juice, and flour. Pour this deliciousness over the cooled crust.
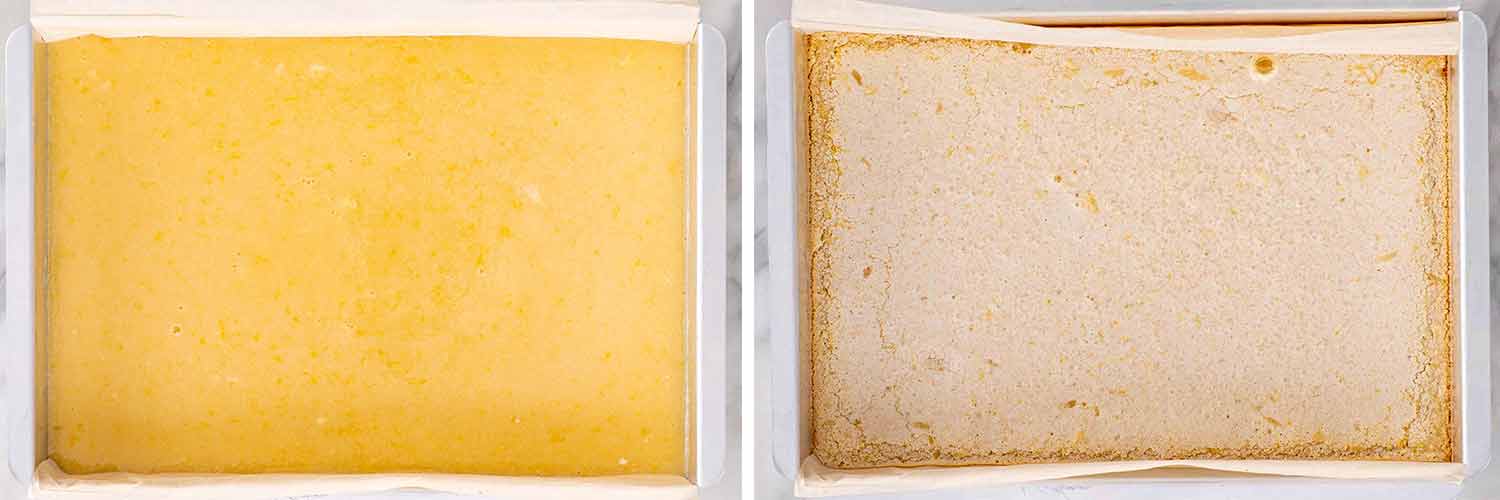
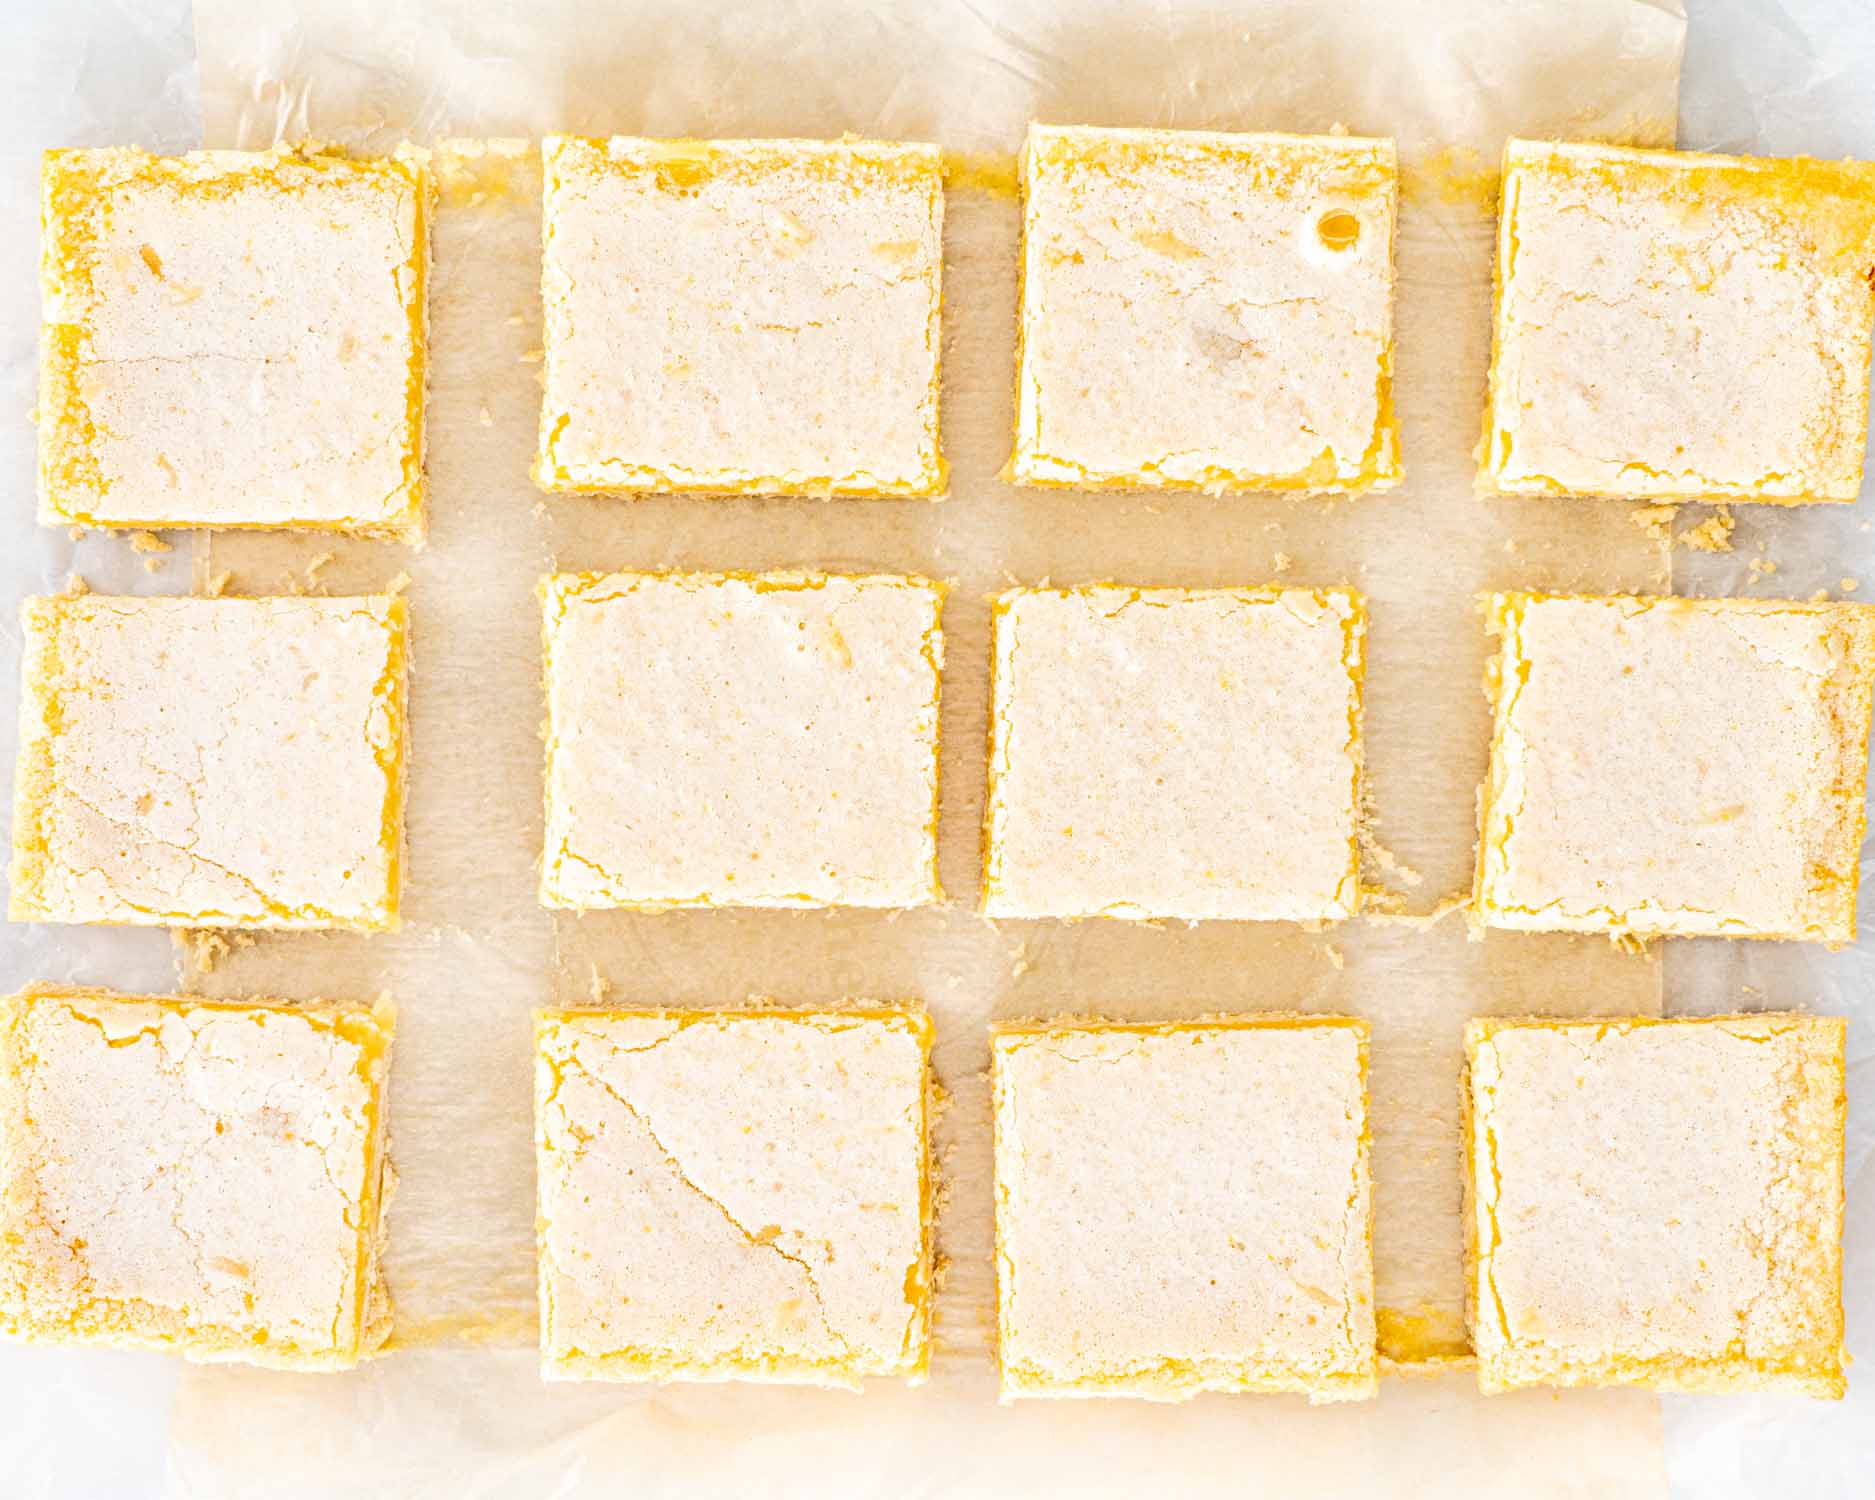
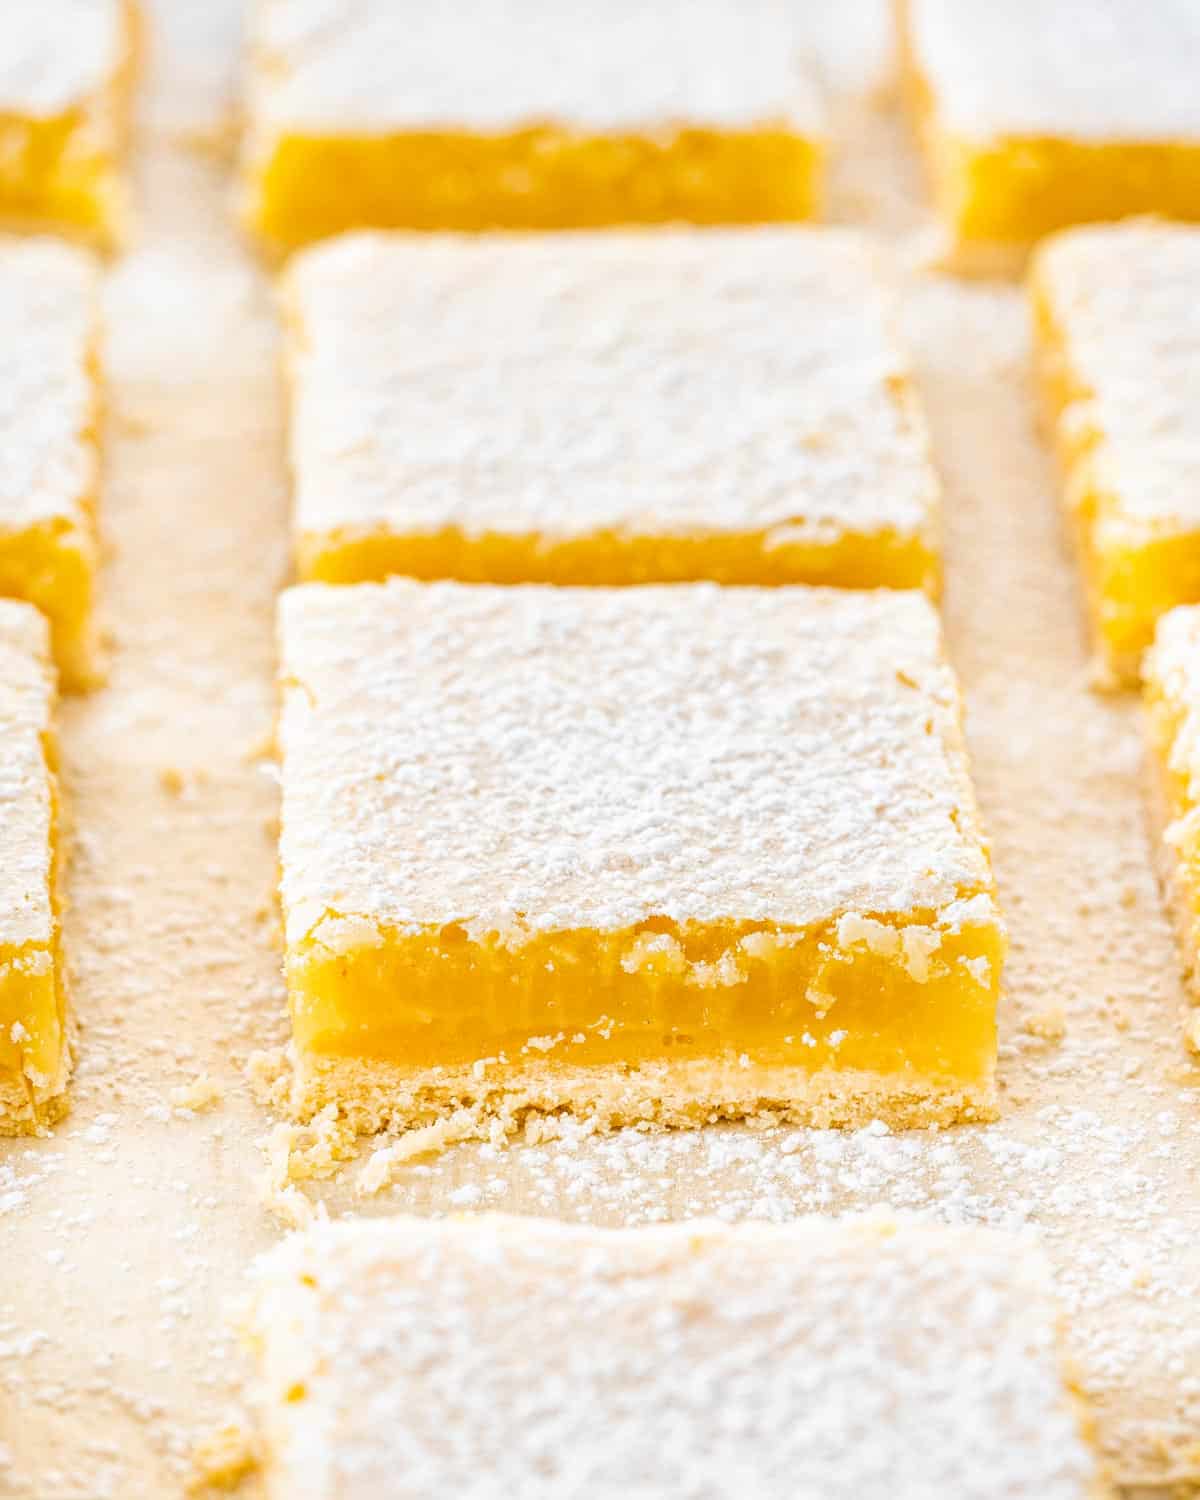
Alright, it’s back to the oven with the pan! Bake it for 30 to 35 minutes or until the filling is set. Let it cool down, cut it into pieces, and give it a sprinkle of powdered sugar.
Frequently Asked Questions
How many lemons do I need to get 1 cup of lemon juice?
You’re gonna need about 4 to 6 lemons to get 1 cup of fresh, zesty lemon juice! It depends on the size and juiciness of the lemons, so always grab a couple of extras just in case!
Can I use bottled lemon juice instead of fresh?
Fresh is best for that zingy lemon punch, but if you’re jammed up, go for a top-quality, 100% pure bottled lemon juice. Just watch out for any added sugars or preservatives.
Can these be whipped up gluten-free?
Absolutely! Use your go-to gluten-free flour mix and keep an eye on the crust’s texture. You’re in for a gluten-free, lemony treat!
I’m feeling adventurous! Can I swap out lemons for other citrus fruits like limes or oranges?
Go for it! Swap the lemon juice and zest with lime for a zesty twist or orange for a sweet and tangy delight, and follow the recipe as is. Enjoy the citrusy adventure!
Expert Tips
- Fine Zest: For the best lemon flavor, use a microplane for zesting to get fine, fluffy zest and avoid the bitter white pith beneath the yellow skin.
- Even Crust: Use a flat-bottomed measuring cup or glass to press the crust into your pan evenly. This helps in baking the crust uniformly and makes it crispier!
- Room Temp Eggs: Use room-temperature eggs for the filling. They mix more thoroughly into the batter, giving you a smoother, creamier texture.
- Sift the Flour: For the lemon filling, sift the flour before mixing to avoid any lumps in your beautifully smooth and tangy lemon layer.
- Chill before Cutting: Pop the baked and cooled bars in the fridge for a bit before cutting. It makes slicing way easier and keeps the edges crisp!

Storage
When it comes to storing these lemony delights, it’s pretty simple! Place them in an airtight container and they’ll be good in the fridge for up to 4 days. If you want to enjoy them for longer, go ahead and pop them in the freezer! They’ll keep well there for about 3 months.
When you’re ready to devour them, just thaw them in the fridge overnight and they’ll be as scrumptious as ever! Whether you’re grabbing one from the fridge or defrosting one for later, they’re sure to be a tangy treat!
These are the best lemon bars that I have ever made, and the best shortbread crust that I’ve had too. I will be making these again. Thank you!
Kim Chalfant
Pairing Suggestions
Looking to elevate your lemon bar experience? Try pairing these tangy treats with a glass of sweet Moscato wine; its light, fruity notes complement the zesty lemon flavor perfectly! If wine isn’t your thing, a cold glass of milk or a hot cup of herbal tea, like chamomile or peppermint, also pairs wonderfully, balancing the tartness with a smooth finish.
Discover More Lemony Desserts
Before You Begin! If you make this, please leave a review and rating letting us know how you liked this recipe! This helps our business thrive & continue providing free recipes.
Lemon Bars
Video
Ingredients
For the Crust
- ½ cup sugar (granulated)
- ½ pound butter (unsalted, at room temperature (2 sticks))
- 2 cups all-purpose flour
- ⅛ teaspoon salt
For the Filling
- 6 large eggs (at room temperature)
- 3 cups sugar (granulated)
- 2 tablespoon lemon zest (grated)
- 1 cup lemon juice (freshly squeezed)
- 1 cup all-purpose flour
Before You Begin! If you make this, please leave a review and rating letting us know how you liked this recipe! This helps our business thrive & continue providing free recipes.
Instructions
- Preheat the oven to 350°F.
- Prepare a 9×13-inch baking pan with parchment paper, make sure the parchment paper is long enough to come over the sides, this will make it easy to pull out the bars.
- In the bowl of your mixer add sugar and butter and beat using the paddle attachment until light. Add flour and salt and mix until the dough starts forming into a ball. It will still crumble easily.
- Dump the crumbled up crust dough into the prepared baking dish and flatten using your floured hands, sometimes I use the bottom of a glass or measuring cup to help flatten it. Transfer the crust to the oven and bake it for 20 minutes, until very lightly browned, you'll start seeing the edges brown. Let it cool and leave the oven on.
- Whisk together all the filling ingredients. Pour over the cooled crust.
- Transfer the baking pan back to the oven and bake for another 30 to 35 minutes or until the filling is set. Let it cool at room temperature. Cut into triangles or squares and dust with powdered sugar.
Notes
- Lemon Zest: Ensure to use fresh lemon zest for a flavorful punch. Avoid the white pith as it can be bitter.
- Pan Lining: Don’t skip lining your pan with parchment paper; it makes removal so much easier.
- Cooling Time: Allow the bars to cool completely before cutting to get clean, sharp edges.
- Powdered Sugar: Dusting with powdered sugar is optional but recommended for added sweetness and presentation.
- Serving Size: These can be cut into squares or triangles, depending on preference. Keep in mind the richness when deciding on the serving size!
Nutrition Information
Notice: Nutrition is auto-calculated for your convenience. Where relevant, we recommend using your own nutrition calculations.
Recipe adapted from Ina Garten.
Recipe originally shared Dec, 17 2014.

Huge fan of yours. Use and pass around your recipes every month.
When I make your lemon bars the filling sometimes does not set, and the filling is gooey. I have tried baking it longer, but the edges just get overdone. Should I beat the eggs more? Perplexed. Please advise!
There could be a few reasons why your lemon bars don’t set:
Underbaking: If the bars are not baked for long enough, they may not set properly. Be sure to bake the bars until the center is just set and no longer jiggles.
Let them chill: You might need to chill your lemon bars for several hours to set properly.
Too much lemon juice: If there is too much lemon juice in the filling, it can prevent the bars from setting properly. Be sure to use the amount of lemon juice specified in the recipe.
Humidity: High humidity can make it difficult for lemon bars to set properly. Be sure to store the bars in a cool, dry place and avoid exposing them to high levels of humidity.
So so yummy! and so easy to make. Thank you for such a great recipe!
My pleasure, glad you liked it!
What if I don’t have a mixer with a paddle? Wil I still be able to make the crust with an old sunbeam mixer?
Shouldn’t be a problem!
If I want to make this recipe in an 8X8 pan what do I need to adapt?
They’ll come out a bit thicker but still good! The bake time may vary. Keep a close eye on them as they bake and add more time as necessary.
This recipe turned out great. I made it in an 8X8 glass pan that was full to the brim. I adjusted the cooking times on the crust and the filling by about 5-10 min each. Delicious!
These are the best lemon bars that I have ever made, and the best shortbread crust that I’ve had too. I will be making these again. Thank you!
I’m so happy to hear this!
On cutting the lemon bars into triangles, could you tell me how to do this. They are more attractive that way. Thank you
Cut them into squares, and then cut them in half diagonally!
Hi there!:) I just made these lemon bars yesterday, I followed your recipe exactly as it states and they turned out perrrrrfect!!!!! They were the perfect balance of shortbread to lemony filling and sweetness to tart flavor. My husband loved them and asked me to make them again soon. Thank you so much for sharing!:)
I’ve used Ina’s lemon bar recipe, and it calls for one cup of flour in the filling. Your recipe doesn’t call for flour in the filling. Could that be why some people had trouble with the recipe?
Good catch, fixed the recipe.
My bars inverted themselves. The crust embedded up on top covering a mush of lemon goo. Even with extra time bashing the lemon part didn’t seem to pull together too wonderfully. Thankfully I’m not opposed to ugly looking sweets, but they didn’t make an appearance at the luncheon i was invited to. The site is only allowing me post 5 stars.
Hi there. Have never made lemon bars or used Meyer lemons before and cannot find Meyer lemons right now. If I use regular lemons, do I use the same amount of lemon juice? Do I need any extra sugar? Your photos look delicious.
Yes, I would follow the recipe exactly as written with same quantities.
In order to use meyers lemon you need to plant a Meyers lemon tree. Mine is wonderful with plenty of supply in winter. Big and juicy with w different flavor than store bought. Store ones will work.
I made these and they didn’t come out right! After reading the comments you said to let the crust cool for two hours!? The recipe says to take out the crust to cool but leave the oven on which lead me to believe you let it cool while you were prepping the filling. Why would you leave your oven on for two hours? Confused!
You don’t have to leave the oven on, of course you can turn it off, but just turn it back on a few minutes before putting the pan back in the oven with the filling, just make sure the crust is cooled off before adding the filling to it.
I made this tonight, I’m just waiting for the finished product to cool down. I can’t wait, it was so easy to make! I am a little worried about the crust though, I just don’t know how it will hold up against all that liquid.
BUT, I loved making this. it was a lot of fun.
Jo, these are beautiful, bright, and cheerful! Perfect pick-me-up for the gloomy skies we are getting here in the Twin Cities. Lemons always bring out the sunshine…at least, in the kitchen 🙂 Your bars here look absolutely stunning.
Thanks so much Amy 🙂
Thanks Stephanie!
Jo, I made these yesterday and they turned out exactly. What a great and simple recipe. Thank you so much, my family totally enjoyed these and we have some left over for Christmas too, as I took some and froze them. Thank you again for such a great recipe.
Thanks Julia, so glad you guys liked them. 🙂